
Developer Information
| Name | Rajaraman Iyer |
| rajaramaniyer@gmail.com | |
| Facebook Page | https://www.facebook.com/jalraapp |
| Location | Singapore |
Introduction
Jalra - Carnatic Mridangam is an unique utility app for musicians. The purpose of the app is to accompany the musician with the sound of Indian percussion instruments called Jalra and Mridangam.
 |
Jalra is a hand held cymbal. Reference |
 |
Mridangam is two sided percussion instrument. Reference |
 |
Morsing is a high pitched pluck percussion instrument. Reference |
 |
Tambura is a string instrument, provides a continuous harmonic drone sound. Reference A web tambura is avaialable here: https://rajaramaniyer.github.io/webtambura.html |
 |
🎹 Digital Harmonium — your phone + a ₹3,299 MIDI keyboard Connect any USB or Bluetooth MIDI keyboard to your phone and use Jalra as a portable digital harmonium. Authentic sampled harmonium sound, triple reed mode, reverb, and built-in tambura — all in one app. 📖 Full Harmonium Setup Guide → ▶ Try Web Harmonium in Browser (no install needed) |
If you like my app, to show your appreciation, please donate
- via this link https://paypal.me/rajaramaniyer or;
- via this link https://razorpay.me/@rajaramanriyer
Screen Components
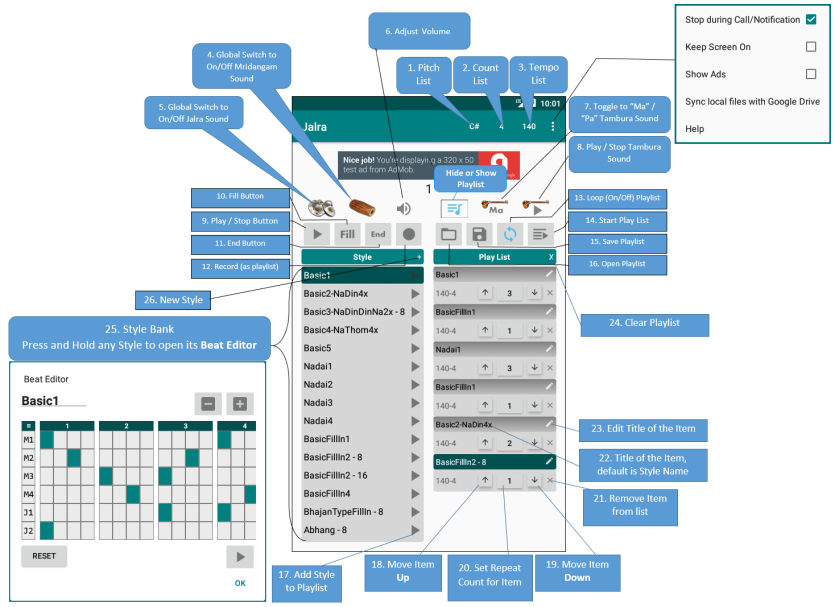
Hide or Show Playlist
| Classic Screen | Playlist Screen |
|---|---|
 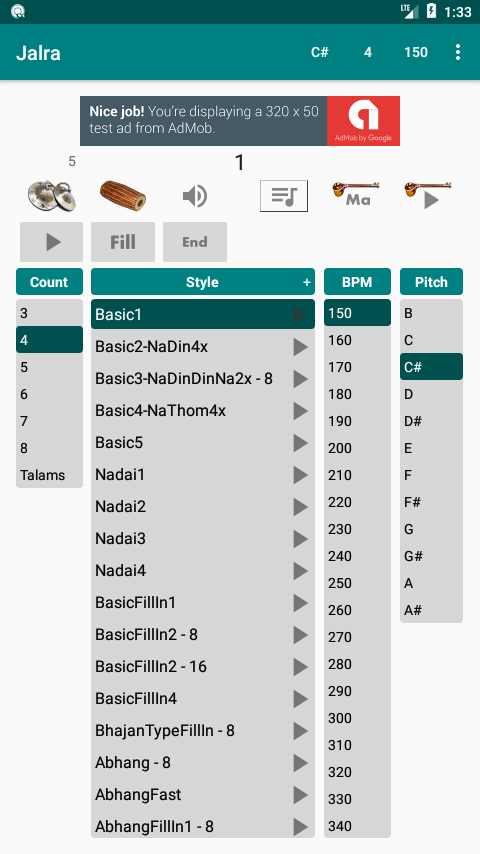 |
  |
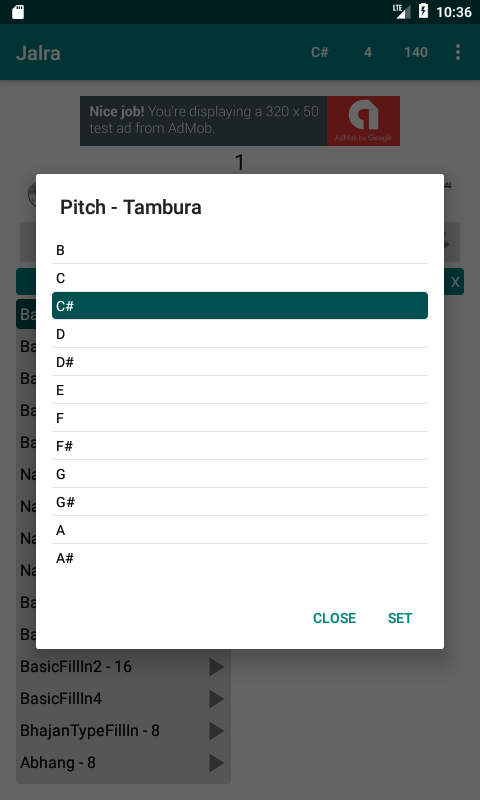
1. Pitch - Tambura
- On the classic screen you can pick the pitch from the right side list under the title "Pitch"
- If Tambura is already playing, then selecting a different pitch will seamlessly change the sound to the selected pitch.
- Another way to change pitch is by using the action bar on the top. There are 3 buttons. Pitch is the first one from right. Touch that to open up pitch list and set desired pitch. The Pitch selected will be shown on the action bar.
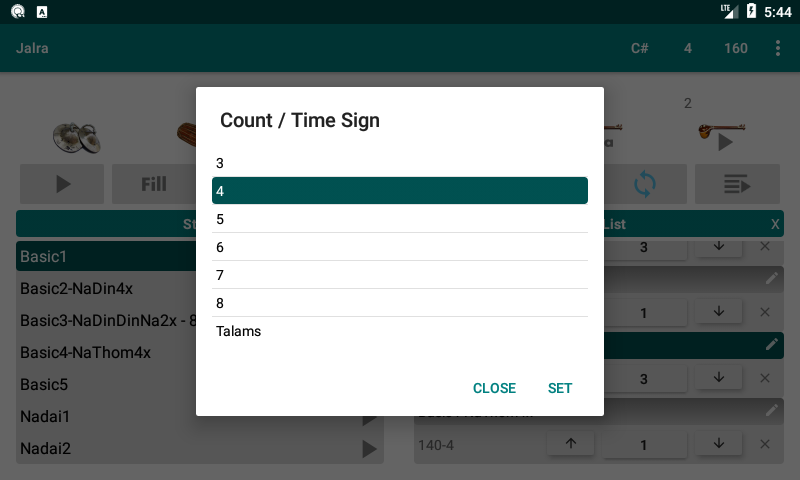
2. Count
- Count is the beat count per cycle. i.e. if count is set as 4, then 4 beats will be played for each cycle.
- The app supports, 3 to 8 beats.
- 3 = Tisra Nadai
- 4 = Chatusra Nadai, Most of the songs will use this. For Adi Talam, Pick count 4 rather than count 8 for better control to change variation
- 5 = Kanda Nadai
- 6 = Roopakam
- 7 = Misra Nadai
- 8 = Adi Talam
- The "Talams" item has the 7 pre-defined Alankaram lessons of Carnatic Music. Read this wikipedia article for more information on these Talams / Tala.
- On the Classic Screen, count list is available on the left side of the screen.
- On the top action bar, touch "Count" button action to set a desired Count.
- Another way to change count is by using the action bar on the top. There are 3 buttons. Count is the 2nd one from right.
Touch that to open up count list and set desired pitch. The Count selected will be shown on the action bar.
3. Tempo
- The app supports any tempo between 30 to 500 BPM. It also has a feature to guess or judge the tempo with a "Tap" button i.e. just tap the button twice to set the speed to the time gap between 2 taps.
- On the Classic Screen, speed / bpm list is available after the style list.
- Another way to set tempo is by using the action bar on the top. There are 3 buttons. Speed is the 3rd one from right.
Touch that to open up Speed - BPM and set desidred speed.
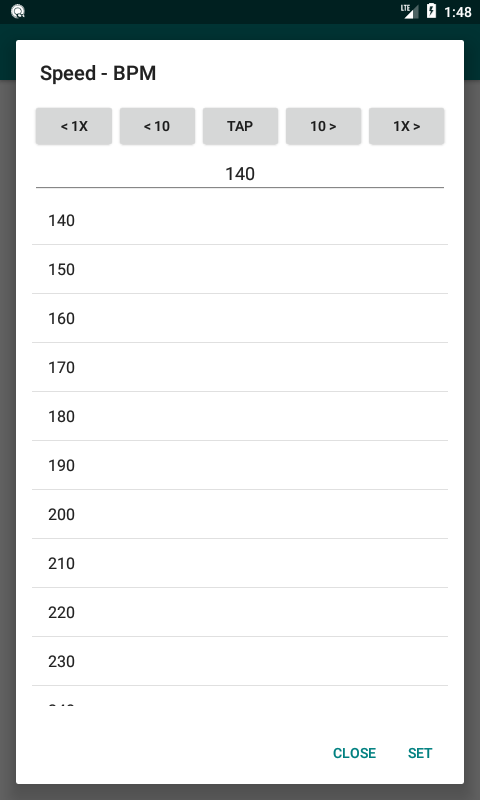
- The button "<1x" can be used to reduce the speed by half i.e. if current speed is 120, then this button will reduce it to 60. The button "1x>" can be used to increase the speed by double i.e. if current speed is 120, then this button will increase the speed to 240.
- The button "<10" can be used to decrease the speed by 10. The button "10>" can be used to increase the speed by 10.
- Finally, there is a text box to input the tempo you like.
4. Mridangam Switch
A global switch to switch to turn on / off Mridangam sound from the mix.
|
 |
5. Jalra Switch
A global switch to switch to turn on / off Jalra sound from the mix.
|
 |
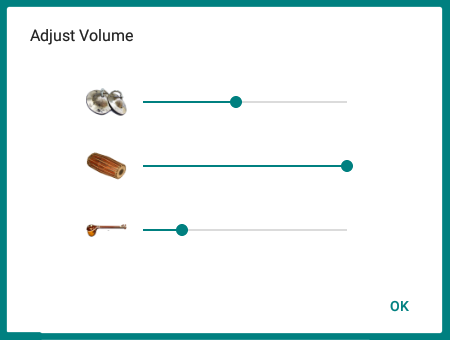
6. Adjust Volume
Click on the Volume Button to adjust the volume ratio of mridangam, jalra and tambura. You can hear the volume level changing as you slide the volume adjuster.
7. Toggle "Ma" / "Pa" - Tambura
Use the "Ma" toggle button to play tambura in "Madhyam". If Tambura is already playing, then switching On or Off the "Ma" toggle button will seamlessly change the sound to the set state.
 |
 |
8. Play / Stop - Tambura
Click on this button, to start playing tambura. When you start tambura, the Play button will toggle into a Stop button, useful for stopping the tambura sound.
 |
 |
9. Play / Stop - Mridangam
Use this button to start or stop playing the percussion sounds. The button will toggle into a Play or Stop button.
 |
 |
10. Fill Button
While the app is playing a style, hit the "FillIn" button to play a static fill variation once.
When the "Fill" button is pressed, the button will change text as "A->B" and then once the variation kicks in, the button text changes back to "Fill".
 |
 |
11. End Button
When playing any variation, hit the "End" button to wait for the app to finish the active playing the active round of the selected style and then stop.
When the "End" button is pressed, the button will change the color of the text to red, and once the app stops playing, the button changes back to its original color.
 |
 |
12. Record (as playlist) Button
On the left side above the style list, there is a "Record" button. Note that it is not an audio record button. Read this feature as "Record as Playlist".
You can start the record button (red color) and further whatever sequence you play using the style list, will get added to the Playlist. Thus recording the sequence for later playback.
This method of creating a playlist is faster rather than adding the items one by one.
 |
 |
13. Loop Playlist Button
The loop button is a toggle button. If turned on then the playlist will keep playing in loop. By default the toggle button is on.
If you want the playlist to stop playing after the last time has played, without looping back, set the loop button off, before starting the playlist.
 |
 |
14. Start Playlist - Paid Feature

The far most right button is the "Playlist Start Button". To play the playlist click on this button. When you start a playlist, the play button on the left will change to a stop button. Use that to stop playing. All other controls will freeze (not usable) when playlist is playing.
When you try to start a playlist for the first time, you will be prompted to buy the feature.
15. Save Playlist

You can save the playlist into a local file. Give a file name or choose an existing file to overwrite.
Note: These files will not be visible in File Explorer app. It is visible only inside the Jalra app. They are internal to the Jalra app. These files will get deleted when you uninstall the app!
16. Open Playlist

You can open a playlist that was previously saved locally.
17 to 24. Playlist

You can add a style into the playlist (right hand side) (#17). When you add a style into playlist, the tempo and count that is active will be used for that item.
Each playlist item has:
- buttons to move the item up or down (#18 & #19)
- a button to set the number of time you want to repeat that item. (#20)
- a delete button to remove the item from the list (#21)
- a edit title button to change the title of the item. By default the title is the style name. But you can change it to some thing meaningful for the playlist like "Stanza1", "Pallavi" etc (#22 & #23)
On the Playlist header there is a small "X" button. Use this to clear the playlist (#24).
25. Style Bank
From the "Count" list, when you choose a count option, the app will show all the styles available for that count in the Style list (left hand side).
While the app is playing a sound, you can select a different style for a variation.
Beat Editor - Paid Feature
Press and Hold any style to open its beat editor. You can change the sequence of play on the beat editor. When you try to use it for the first time, a prompt will be shown to buy the feature. Once you have bought the feature, you can design / tweak the sound on the beat editor.
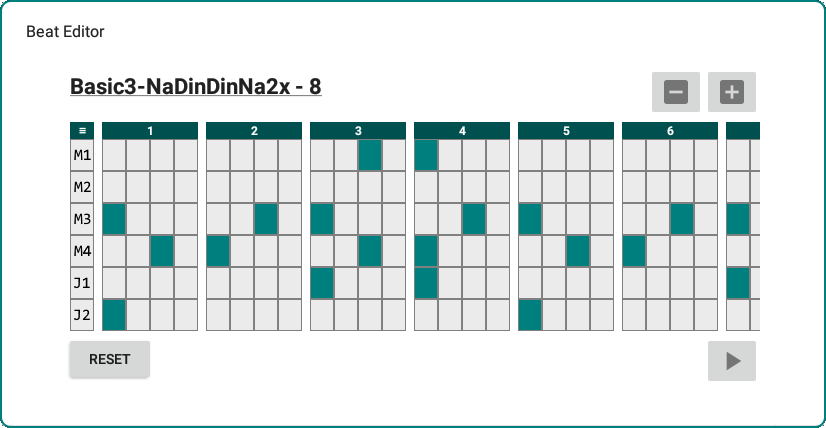
M1 to M4 are the mridangam sound samples. J1 and J2 are Jalra sounds. You can click on them to hear their sound.
M1 is THA / THOM sound.
M2 is THI or RI sound.
M3 is NA sound.
M4 is DHIN sound.
J1 is open Jalra sound.
J2 is closed Jalra sound.
Each beat is divided into 4 parts. Define a pattern by switching ON / OFF each part of the beat.
Use the "+" button to add one more set of beats. i.e. if count is 4, then 4 more beats will be added towards the end.
Use the "-" button to reduce the style by one set of beats i.e. if count is 4, then 4 beats will be removed from the end.
26. New style
On the Style list heading a small "+" button. Click on this to create a new style. A dialog box will be shown prompting you to give a Style name. The Style name given must be unique. Once you click on create, the style will be added to the end of the Style list.
Sync to Multiple Devices
As long as you are using the same google account used to buy the features, you can use them on multiple devices. After your purchase, if you try to use the feature bought on a different device, it may prompt you to buy it again. Don't worry, just restart that device and the feature should be available.
Keep Screen On
In the menu option there is a switch to either keep the screen On or Off. You can use this if you want to keep seeing the screen when both your hands are occupied.
Advertisements
The app shows 320x50 pixel ad banner on the top of the main screen. This will keep refreshing every 60 seconds
NoAds - Paid Feature
The menu has an option to buy NoAds feature. If you buy that feature ads will stop showing up.
🎹 MIDI Harmonium — Your Phone as a Portable Harmonium
Your phone + a ₹3,299 MIDI keyboard = a portable digital harmonium.
Jalra uses real harmonium samples — not a synth patch. Connect any USB or Bluetooth MIDI keyboard, enable harmonium in settings, and play. Triple reed mode, reverb, and built-in tambura included.
References
Problems with in-app purchases
Returns and refunds on Google Play